You can join me and my sister over on Sm…..(laughing).
Hey guys its Phil from Smilingardener.com. If you haven’t checkout out my free online organic gardening course you can do that right on the homepage of Smilinggardener.com.
Today we’re talking about home landscape design. If you’re designing your own landscape one thing that a lot of people will do is just go to the garden center and buy all the plants that look nice and then get back home and start placing them and hope that it works out okay.
A much better process is to figure out your goals and do some designing first and a whole bunch of things are going to work out better if you do that. So I’m going to give you about 6 steps today. First very important step is to set some goals, and it doesn’t have to be a big process you could do it in 5 or 10 minutes if you’re in a rush, but there are 3 parts to this and the first part is the look and feel.
How you want it to feel, how you want the aesthetic of your garden to look like. So that could be certain flowers, certain plants, certain design features. Maybe if you want to have more of a relaxing garden you’re going to use more curvy kind of plants and designs which is what I do in a lot of my gardens.
If you want more of an invigorating kind of party garden you might go more formal, straight edges, diamond shapes and you know, brighter colors – things like that. So you want to think about what kind of a garden you want to be in. I’m just working on a very small section of the garden for this little video today. So what I’m going to do here is put it what’s called the three sisters guild.
I’m not going to talk about it too much today but it’s basically a Native-American way of planting corn and beans and squash together. I’m going to put that in here and I’m going to make it a little more interesting with some other parts that maybe they would have used too like sunflowers and cleome – if I can find them and if I have the time. Maybe I’ll talk about that a little more in another video.
But that’s really my main goal here is putting together that aesthetic of that 3 sisters guild. The second part is usage – how you want to use your garden. So you may need a big area for playing sports or maybe you need a big area for having parties for dining outside, maybe a big area for actually gardening, potting and things like that.
And then you also need to think about paths through the garden because a lot of times, you know the paths don’t work you can’t get wheelbarrows in and out and things like that. So it’s really the layout of the garden based on what your goals are and the goals are of everyone in the house.
Again, for me right here my main use I’m trying to put in this very cool kind of food garden. It’s, you know it’s a way to grow food and actually grow kind of a balanced diet all in one little space. The third part of this which isn’t talked about as much in conventional garden design is the ecosystem. How can we really improve our ecosystem here and create a healthy environment.
For me, what that means is a lot of the things I’ve been talking about in other videos like composting, mulching, using microbial inoculants – all these are ways of really improving my soil and improving my ecosystem health. I’m also doing crop rotation by bringing the corn and squash in here because last year I had tomatoes in here and peppers so I’m doing a different plant family this year. So that’s another thing.
And then I also at the very back of the bed I have some English Ivy that I really need to keep at bay because it can become kind of invasive. So those are just some, a few ecosystem goals. You might need to control erosion, or you might want to be capturing rainwater in a certain part of the garden or attracting beneficial insects, butterflies, pollinators.
You know we have many goals that we can think of to improve our ecosystem but it’s a really important part of planning your garden. Step 2 is to actually draw the site and I’ll show you because I’ve done it here. This one’s obviously very simple which is good for this example. So you can see what we’re looking at here, the house.
And here’s my drawing. Here’s the house, I have this little 240 square feet. parcel that we’re looking at today. Off to the left is a Burning Bush standard which you can see over there. There’s a Rose of Sharon which I’ve drawn right here and there are a few other shrubs here and the English Ivy is back here.
So what you want to do when you do this is use graph paper. And because this is such a small garden and I could make it so that one square is one sq. ft. but often one square would be 3 feet by 3 feet. So 9 square feet. In this case I didn’t need that. So the key here is to draw everything to scale as much as possible. So I measure everything with a tape measurer or pacing off is a little bit easier way of doing it, but not quite as accurate.
And then that’s going to become important when I’m choosing plants because then I know exactly how big a plant or approximately how big a plant is going to get – I can design appropriately.
Other than that it’s basically you know, even if you just had a lawn here you just want to draw it to scale and anything there like the buildings, pathways, whatever is already there or plants, and utilities too you could put utilities on here if you have an irrigation line, a gas line, hydro wires over head.
So that’s the site plan and when you’re done with that you want to make some photocopies because we’re going to be doing a few different things with it. Step 3 is to do a site analysis and that’s when we look at the different energies that are coming onto your site and I guess again I’ll just show you. This time I’ll show you a different drawing.
This is the forest garden area that I ended up putting in last year. But before I put anything in I had to see what was going on. The main thing I often look at is the sun so I wanted to see where the full sun was in this area because I was going to plant fruit trees.
I saw down here was shady, up here was shady, and so that’s a really you know, we really need to know where the full sun is and the part sun and the shade is because that’s going to be really important for the health of our plants. Putting them in the right spot! I looked at the wind, I saw the wind was coming from up here – that’s important because you don’t want to put fragile things in a wind break and things like that.
It’s really important to…or maybe you want to block the wind, or maybe you want to harness the wind. So we really want to know where the wind is coming from. We want to know where the slopes are. This was a slope down here which resulted in a seasonally wet area. So that was really important for how I ended up planting.
We want to know where the good views are. In this case it didn’t matter that much to me but there might be a view you want to block or there might be a view you want to accentuate. So all those different kind of things that you might want to think about that are happening on your site this is where you want to put them on there and that’s really going to inform the design.
Step 4 gets to be really fun and we call it functional diagrams. It’s where to get to start dreaming about what you might want to do but there’s really no pressure there’s really a fast way to do it. And that’s using bubble diagrams. So I’m going to show you yet another part of my garden because again, for a spot like this right here I don’t really need to do too much bubble diagramming because it’s just a little area.
But for something that’s bigger you can do this and it’s just a lot less work then trying to get too detailed too fast. So what I do is I look at my site plan that I already did first and my site analysis, I’m looking at those and I’m making decisions based off that. So I’m just roughing in things – where might I want a cistern?
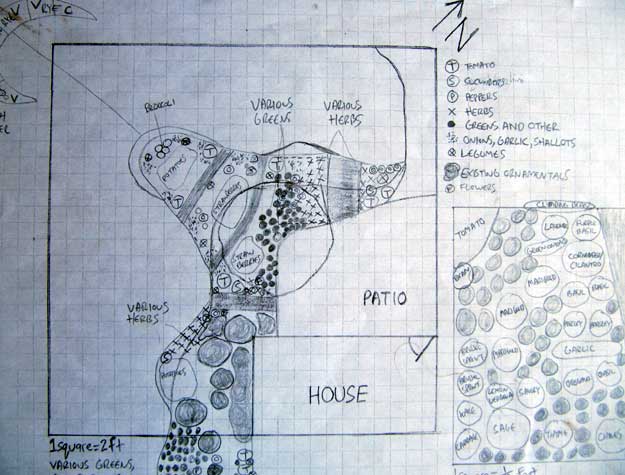
Where obviously coming off the house I capture the rainwater, throw it into a cistern. Near the cistern I want things that need that water occasionally like herbs. So I have herbs in containers on my patio right outside my kitchen door. So that I can harvest them daily, because you use herbs often.
I have a dining area over here, herbs over here, and so you just starting to dream with kind of bubble diagrams and then you’re not having to get freaked out about measuring and using rulers. Here’s the full sun down here so I put a lot of food plants and flowers down there.
I drew in a retaining wall that I never built and I knew I wasn’t going to build it anytime soon but that’s where the slope is. Compost bin is uphill that means I’m always bringing the compost downhill when I need it. Here’s a windscreen which means that this is a nice protected zone if I need it.
And I draw in the water source so I know these food plants here are going to be able to get water very easily. I ended up building a raised bed over here because I have to water that thing regularly. It’s nice to have a water source right there, So the nice thing about doing it like this is that you can – and I know I’m flying through this guys, but I have to keep these videos short for youtube.
You can do a few different entirely different options when you’re just doing bubble diagrams and you don’t want to get too detailed. That’s what I really like about that, just start dreaming. You don’t have to draw plants when you’re just doing these bubble diagrams because that gets way too detailed.
What you want to do is just say Hey, where might my compost pile go? Where…is this is place for a hedge? Is this a place for a pond? Is this a place for some annuals? Just, you know, the dining area? You don’t have to grow an exact table yet just really think fast and it’s really a fun way to do it.
The other thing about the bubble diagrams is that’s really when you’re…last time I was talking about permaculture design and so the bubble diagrams are when you’re looking at all these elements like pond, greenhouse, compost pile and you’re trying to get the integrations between them and kind of draw them out, figure out how they can related to each other and help each other out so bubble diagrams are great for that.
The fifth step and this may be optional for you is called a concept plan. And what this is, is where you’re taking those bubble diagrams and you’re starting to draw them a little more accurately. You’re not necessarily going in and choosing every individual plant yet.
This is especially done by landscape designers when they want to present something to the client but they don’t want to go in and draw dozens or hundreds of plants in detail until they’ve seen that the client really likes the overall concept. So you can see what I’ve done here. Again this was that other part of the garden. I’m drawing the beds in more detail.
I’m drawing things that I know, for example this dining table – I measured the size of it and I drew it. But I’m not drawing individual plants yet. This might be a case where some of the main plants could be drawn in and drawn to size. Or maybe, there’s kind of a lot of ways to do it but you really don’t have to draw in all the individual plants. Now you might not need to do this, you might go right to the last step which I’ll talk about in a minute.
I actually like to do this in my vegetable garden because I like to work from this as my final plan. Because if I’m planting forty different kinds of vegetables throughout the garden I like to have a lot of flexibility. I just like to know in general where I’m thinking of putting things. So that’s kind of what the concept plan is.
The sixth step, the last step is the planting plan and that’s when you’re designing exactly which plants you’re going to be using and you’re drawing them in to size. And what happens with a lot of gardens in they’re planted way too densely because you buy these little plants that are one or two or three gallons and you plant them and the garden looks so sparse so things get planted too close together.
But what happens is these plants get a lot bigger. So what you do, on a planting plan is you draw them the full size they’re going to get to, or at least the size they’re going to get to in say ten years. It kind of depends people have different methods but really I like to draw them to the full size they’re going to get to.
And what that means is I plant things far enough apart. So, in a vegetable garden I don’t necessarily go to this step but in my orchard, my forest garden, I did because those are perennial plants they’re going to stay there I want to make sure I give them enough space. So you can see I’ve drawn them the full circumference of how big they’re going to get.
And I’ve obviously used everything that I’ve already been looking at – my bubble diagrams and my concept plan and I’m just drawing them in here and the nice thing then is when I go to the garden center I have a planting list – however you want to do it there’s many ways you could do it – but I have a planting list.
So you can see from this particular garden that I put in last fall the sun is coming from the south down here shining like this. Down here I’m keeping some of these trees a little more dwarf and some of these fruit trees I’m letting to grow a little bit bigger, kind of how nature intended.
Down here where the wet area is, is where I planted my pears as I mentioned in the permaculture video because they can take more wet feet whereas up here my apple trees don’t like the wet feet so much so that’s where they are. And then here’s a Stella Cherry, it’s happy to be in this little bit more of a sheltered spot in my area. So many different…I can’t get into too much detail in these videos because I want to keep it short but I try to think of many different things by the time you get to this point that are really going to make for a good design.
And I guess I’ll briefly show you my little “design” for this garden here even though its not really a design so much as laying out the three sisters. The corn and the beans go where the “C”s are, the squash goes all in between them. So that’s it for home landscape design.
If you have any questions at all ask them down below and I’ll be sure to answer them. If you haven’t signed up for my free online organic gardening course you can do that down below and you can also come and join me and my sister over on Facebook at Facebook.com/smilinggardener.

Thank you for explaining that the first step in designing your landscape is figuring out how you want it to look and feel. I’ve been thinking about giving my daughter some free reign with coming up with a design for our landscaping since she seems to really enjoy that kind of thing. I’ll be sure to share this with her and see if we can both come up with a theme or feel that we agree on so that she can make a design that we’ll all enjoy.
Thank you so much Phill. Quite intresting. Am about to retire from the civil service job, come July. I had the previllege to take a Thrive For Good training last year. I was offered”scholarship”.. Am planning to go into full gardening to improbe the health of my community .Thanks for your invaluable materials. (O. Felix)