If you’ve always wanted a pet, but think:
- Dogs are too messy,
- Cats are too stuck up,
- And goldfish leave something to be desired in the personality department
(no offence intended to my dog/cat/fish loving readers),
I have the perfect solution for you: worm bin composting!
It’s also called vermicomposting, and it’s done with red wrigglers, or Eisenia fetida.
Click for video transcription
Phil: Hey guys it’s Phil from smilinggardener.com, if you haven’t checked out my free online organic gardening course, you can do that right on the home page of smilinggardener.com. Today we are talking about worm bin composting; maybe you don’t have a place to have a big outdoor compost but still want to recycle those fruit scraps into something really nutritious and that’s where worm bin comes in because it’s really compact. You can do right inside and then mix really wonderful compost.
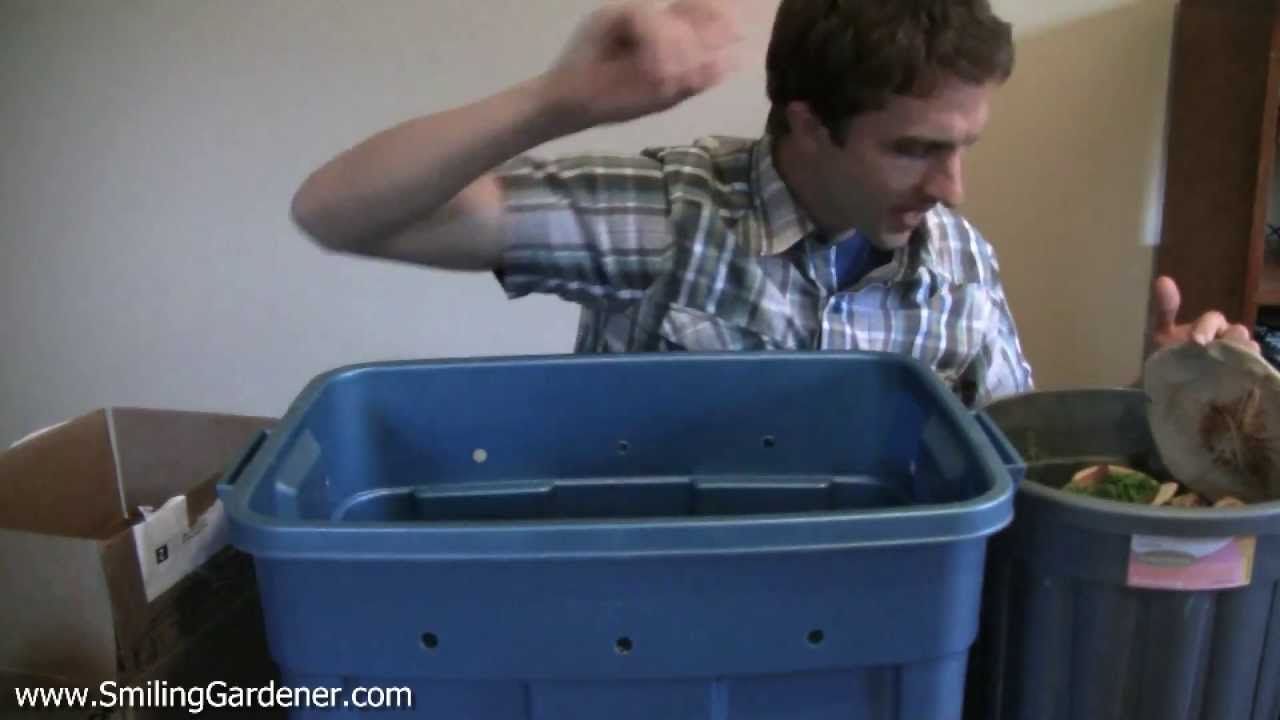
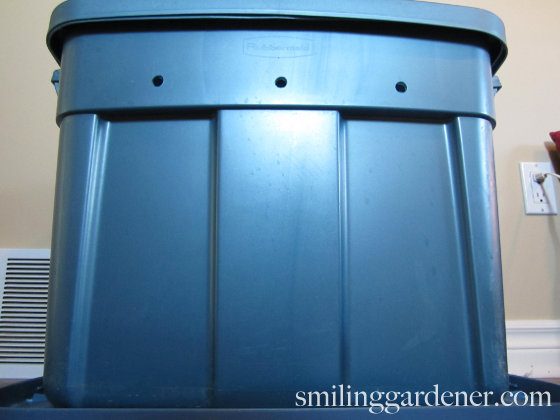
So the first thing we are gonna do here is to make a worm bin, you can buy them online already made but I want to show you how to make one from much cheaper. The size really doesn’t matter too much but what I have here is probably 15 inches wide by 24 inches long by maybe 24 inches tall something like that, start with the bottom. Can you see the bottom holes, I have the 6 to 12 holes. I usually drill in the bottom and that per drainage, so that extra water can drain out then along the sides I usually have 6 to 12 holes and also I will show you these holes in the lid that allows for just air movement because you know worms to breathe air just we do. You also need just to settle the bin up a little bit.
So it’s allowed to drain, so any kind of wood blocks or if you want to have some of the fun, you find some little branches like that and you set them down underneath the bin, so it’s sitting up. Other thing you need to do is have a drain into something. We happen to have another lid that’s a perfect way to catch the liquids it’s gonna run out otherwise any kind of a tray will work. The worms need a home and since we are gonna be adding a lot of nitrogen rich food scraps. We need some carbon rich bedding as we call it. You can use some leaves for that, some straw for that but what’s commonly done is some newspaper.
Another thing we can put in there which is a very, very good idea is some sand. Worms need sand in order to process their food. These few little bit sand in there or if you just have some soil to have a little bit of sand in it that will be fine too. You don’t necessarily have to go and buy sand, it’s basically a lot like a compost power where we wanted to be moist like a runout sponge, a worm bin is even kept a little more moist. What’s can be nice somewhere but still you want the worms to be able to breathe air.
So we don’t want to be too soaking with, we get red regular worms which tend to hang out sometimes in compost piles especially in maneuver pile; most of us what we do is we go by them and that can be a little tricky to find in your local area, sometimes you might have a local person who sells them or sometimes you might them at a farmer’s market, the often you can online do a little bit of searching and find them and have them shipped to you, often what’s recommended for a box besides is about a pound of worms, it’s leaking and it’s being cut just like it suppose to.
I have gotten a way with half a pound of worms before because they can be a little pricy but really not too bad, so I had some worm shipped to me and these people did a fantastic job shipping, so that the worms are in this really nice bedding already. You can see any worms in there, in order to help them settle in, it can be handy to get a light and turn it on and kind of put it into your bin like that, worms don’t like light so they are gonna go down into the bin there and get really comfortable down in their bedding, after a few days or maybe as long as a week, you can start feeding your worms once they are comfortable in there and now eat pretty much any food scraps but there are few things you shouldn’t really feed them. You don’t really want to feed them much in the way of meat, dairy, really oily foods, really salty foods or really hot spicy foods and that’s about it, we don’t love citrus so not too much citrus and also not too much in the Allium family like garlic and onions but a little bit isn’t a problem, egg shells no problem, parsley, broccoli.
I wouldn’t go for the citrus, if I can help it and in all kinds of other foods scraps we are having here, pepper, sweet potato, it’s all good. So how do you do this, well you can use your hands or sometimes after a while especially once it gets going, it can be kind of handy to use a spatula to get in there. I am gonna to start adding food, I will take a corner, I will bury the food in that corner and I basically start kind of slow, one pound a week then maybe 2 pounds a week and then for a bit in the size maybe up to 4 or 5 pounds a week eventually and I have probably added about twice a week, so I don’t go adding it everyday just because I don’t want to disturb than more than I have to, so what I will do is I will add into this corner and kind and buried in there and that helps stop the food flies from coming and just mix it better for them, it’s kind like when you are mixing up the compost pad you want to mixed together that I will go into this corner, then I will skip kind of working along the bin every few days, pretty more food scraps in by the time I have finished over here and I come back to the beginning, these food scraps should be largely broken down and like, then I can start again at the beginning. If you have any questions about worm bin compost you can ask them down in here, if you haven’t signed up for my free online organic gardening course, you can get it down in here. You can join me and my sister over on Facebook at faebook.com/smilinggardener.
In case their wriggly cuteness isn’t reason enough, they offer some of the richest compost available, and a great way to deal with your kitchen scraps without leaving the kitchen, especially if you don’t have space for an outdoor compost pile.
Even a small amount of worm bin compost, or castings, is a huge benefit in creating a healthy organic garden…
How To Build A Worm Bin

Worms like it simple, so any worm composting bins that are made of non-toxic materials will do.
The simplest way is to buy one ready-made, but a diy worm bin is easy.
When making a worm bin, you can start with a plastic storage tote, about 18 inches wide by 24 inches long by 18-24 inches high.
Drill about 12 holes for drainage and aeration in the bottom, about ¼-½ inch in diameter, then another dozen or more on the sides towards the top.
Don’t worry about the worms crawling out – you’re making great habitat for them inside the vermicomposting bin, so they’ll have nothing to gain by escaping unless something is radically wrong.
Who breaks out of a 5-star hotel?
For the drainage holes to work, you’ll need to set the worm bin slightly off the ground on bricks or something.
You’ll also need a catchment tray underneath it for the small amounts of leachate that drain out. A second lid works perfectly for this…
Preparing The Worm Bin
Since you’ll regularly be adding nitrogen-rich food scraps to the compost worm bin, you need some carbon.
Make the bedding out of high-carbon materials such as straw, leaves, and non-glossy newspaper.
These should be shredded, though some coarser bits will enhance air circulation.
Worm bin composting is slightly more moist that regular composting, so don’t be afraid to get it nice and wet, as long as it’s not waterlogged.
They prefer a temperature between 60F and 80F, out of direct sunlight. They’ll survive at lower temperatures, but become sluggish and unable to process much food.
You might not like sand in your own bed, but worms thrive if you add a handful of sand or sandy soil to their bedding. They have gizzards, like chickens, and need the sand to digest their food…
Getting Vermicomposting Worms
It’s supposed to take about a pound of worms to start a worm composting bin.
I’ve gotten away with a half pound.
You can add them to your cubic foot of bedding once it’s well moistened.
It’s great to let them settle in for a few days before feeding them, to give them time to adjust to their new home.
In fact, if you keep the lid off for the first day and perch a light over the bin, that will encourage the worms to burrow down in there.
Worm bin composting is done in the dark because the worms don’t like light, so it’s best not to disturb them too often – no need to turn the materials in the worm bin, because they’ll do it for you…
Feeding Your Worm Bin
Red wrigglers have slightly refined tastes, but will generally eat most things you eat, with the exception of meat, dairy, and very oily foods.
They’re not too keen on citrus, onion and garlic skins, very hot spices, or excess salt, either, though they love their coffee grounds like a Wall Street hedge fund manager loves his triple macchiato.
It’s important not to overfeed them at the beginning, so you can start by giving them about 1.5 pounds of food scraps per week. To avoid fruit flies, make sure you bury the food in the bedding.
Eventually, composting worm bins this size can process up to 4-5 pounds of food each week, which is perfect for two people, or one person who eats a lot of veggies.
You can work your way across the bedding every couple of weeks, then start back at the beginning, where the original food scraps should be mostly broken down into nice, juicy black worm poo…
Ask me your worm bin composting questions below or upload a picture of your worm compost bin!


Great video thanks!
I love my worms! We started a worm bin in February after moving to Hawaii. It’s easy to get worms here, and the lady at the worm store gave me great tips and instructions (just what you said, Phil, but more tailored to local conditions. We’re using a mix of Red Wigglers and Indian Blues). The worms are thriving, we regularly use the diluted leachate in our little backyard garden, and should be ready to collect some compost soon! Enjoy the pics.
Beauty. Looks plenty wet to me in the 2nd photo – may be time to add more bedding? Good job.
Thanks, Phil! Yes, time to add some more bedding.
If you have a second plastic bin, the worm bin will stack nicely into it and catch any drips or escaping worms. If they try to escape, it may be because of anaerobic conditions (too wet, not enough air flow, etc). Adding shredded paper or cardboard helps with the wetness while lifting the lid for a while or adding more holes helps with aeration.
Yes, as with Raymond’s comment, that’s a much better solution than mine to stack it in a second bin. And good other tips, too. Thanks.
Great Video Phil…one option for your listeners that I’ve found works well is…using a smaller sized rubbermaid container like the blue one you demonstrated with. Take that container and sit the large one inside it. This allows for the worm castings to drain into a larger vessel. It’s really tight and never leaks. 🙂
Yes, that’s a much better solution than mine. Thanks.
This is a good site to find others in your area who may have extra worms to sell or to make suggestions regarding your worm bin: http://vermicomposters.ning.com
Red Wigglers can be found at ANY bait shop in the country.
Cool, thanks for letting me know. I don’t fish so I’ve never been to a bait shop. Just make sure you get Eisenia fetida rather than other similar worms.
how do u keep ants out just started my worm compost,it sits outside in shade on my patio? help!!
Phil is describing a wet aerobic composting style here.There’s another style that is anaerobic, where you start with a bin half full of bedding and sterile potting soil (NOT worm castings), and rather than throwing your scraps in the top of the bin, dig a hole with a garden trowel and bury your scraps. That style should attract fewer pests, and it always smells like finished compost (earthy, like a your garden after a spring rain). I kept one of these under my sink for about two years. It only smelled bad twice.
It’s okay if there are ants in there – no harm. But if the conditions are moist, they probably won’t hang around too much, or at least that’s been my experience with ants.
Great article! I’ve enjoyed my worm factory for almost three years now, with the same batch of worms. I’ve found that if it’s sufficiently moist, ants won’t be interested (the rest of the kitchen, they love, but not the worm box); however, too moist and it turns into a gnat swarm (also, I think, feeding too much juicy stuff at once that they can’t go through fast enough gets gnats a leg up). Put in three or four rotten pears this spring and battled ungodly swarms of gnats for weeks before we finally bug bombed. The worms don’t seem to be bothered by it. It was bad enough I reduced my three working trays to the bare minimum in one, just enough for the worms to have somewhere to hang out, so I could be sure the gnat eggs were all outside the house. Other than what was my own mistake, it’s worked brilliantly. It’s never smelled, and we keep it right in the kitchen. The kids love it too.
Thanks so much for sharing Anna!
you add citrus to your worm bin?????
It’s counter-intuitive. They explicitly tell you not to do it. But I swear that red wrigglers go nuts for grapefruit peels.
I actually don’t add much of any (as I said in the article and the video), but like Jason, I’ve never actually noticed any issues. I think it could be a problem if you added a lot, though.
This summer I started a outdoor worm “bin”. I live in Calgary in Zone 3, and my friend has had success with this for years. I use a deep north facing window well for the “bin”. I stop feeding the worms at the end of August so that they can finish eating everything I’ve given them as winter approaches. When it gets too cold, they burrow down deep next to the house and spend the winter there where it’s warm below the frost line.Now unrelated to the worms, but in the spring I load my compost bins with all the kitchen scraps I’ve saved in pails that have accumulated on my deck and all the leaves I shredded the previous fall. However once they’re loaded, I don’t want to keep adding stuff.That’s where the worms come in… in the spring they crawl back up to the surface that’s where I again put all my kitchen scraps all summer until it’s time to cycle again….
Sounds like a wonderful system you have going there Karen. Thanks so much for sharing!
A good post on worm composting !
the video did not explain how you know when the compost is ready to use and do you remove the worms to start a new bin. Sorry I am new to this.
Hi Lynda, you know it’s done when the food scraps and bedding are all gone and it looks like compost.Then, you can spread it out on a tarp and remove the worms by hand, or just stop adding food to one half of the bin for a month or two and most of the worms will migrate to the other half where you’ve continued to add food.
Phil, can I add compost starter to the bin of red Wigglers ?
Sure, as long as it doesn’t contain chemicals, you’re fine to do so.
I’m interested in worm composting but my kitchen really doesn’t have space. I can keep it in the garage or on the covered patio but I live in South Texas and hot summer days are often over 100 degrees. You said they like it around 60 to 80 but how much heat can they take?
Hi Jan, Phil’s out of the office now so I (his sister) am responding on his behalf. 100 degrees and over is getting a little too hot for the worms! They can take a little over 80 but not too much more.
How do you know when it’s time to harvest or collect the compost made by the worms? Also, how do you suggest collecting it for the garden without hurting the worms too much? Or do you just add it all to the garden and start a new setup afterward?Thanks!
The compost is ready when most of the original materials have disappeared – i.e. when it looks like finished compost. My main method of harvesting is to stop adding food scraps to one half of the bin for a month or so, but continue adding scraps to the other side. The worms will mostly migrate to the side that’s still receiving food scraps so you can easily harvest the other side.
I went back to college at 50 to finish my education degree. As a science method project we had to do a ‘science fair project, as a sixth grader might do.’ I made a worm bin similar to yours, (but with a two bin system) and have taken half my worms each year out to the garden. I belong to freecycle and once saw someone who wanted worms to start a bin. I was happy to share the worms and the plans! I taught a hands on class at the Northwest Stewardship Center a couple of years ago and raffled off our finished product. So easy, and so rewarding. The best thing about the two bin system is that the excess moisture drains out! Worms do not like to be over wet, and if the bin is too wet, they will try to crawl out. Check the bottom bin every week or so. Occasionally a worm gets through the hole. (Don’t use this liquid leachate on edible plants; if you use it on others, dilute it a lot.) But you can make worm compost tea indoors with just a handful of castings and a five gallon bucket and use it for your indoor plants. At garden time, use more castings and a bigger bucket. My worm bin is now 13 years old and going strong.
Thanks very much for sharing. Good advice 🙂
Phil, I am saving up a substantial amount of coffee grounds and vegetable scraps for an order of worms. If I feed them non organic grounds and scraps, will they produce pure organic castings, or would the castings have traces of gmo’s, pesticides and other chemicals that could contaminate my clean soil? Thanks
They would have traces. Some of the chemicals would definitely be broken down – not all of them, but enough that it would probably be worth it to use it. The gmos won’t be broken down, and we don’t really know the full consequences of that.